Blogs
are becoming increasingly popular in today’s world. With all the major
corporations and brands all over the world getting involved, eating up their
slice of the ‘blogosphere’. The statistics for 2013 show that social channels
such as Facebook, LinkedIn, Google+, Twitter, Instagram and Pinterest are
increasingly on the rise becoming the first line of communication for most
people. However, Blogs are vastly approaching this excessive popularity. For
example 6.7 million people blog using blogging sites such as Medium, Svbtle, Blogger and Tumblr however 12 million people blog
via social networking sites according to social media today whom also
state that small businesses that embark on using blogs generate 126% more
leads. As far as reach is concerned when it comes to blogs ‘Blogger’ which
is one of the most popular blogging sites in the USA, has around 46 million
unique visitors not each year but each month! ‘Tumblr’ is another blogging site which is
becoming increasingly popular as it is designed and used linking blogging to
social media. This just goes to show that
blogging is a very important social channel for both personal and professional
use.
But how worthwhile is blogging and will it become more so than social
networking?
When
it comes to blogging, in order for your blog to become the least bit effective
you have to get it known and you have to generate content which people find
interesting, but that doesn't mean writing for the sake of writing! Blogging
enables bloggers to write about topics informing and enlightening people on
what they might not know or what they need to know. Allowing other people to
comment, ask questions, voice their own opinions and share the content of the
blog in an interactive, chatty way via their own social networking pages.
Soon
there will be no need for face to face communication...
Wasserman-The Boston Globe by Tribune Media Services
So how
do you get your blog out there? How does your blog become popular, a people
port of call? Well that is where social networking comes into play. Unless you
are a well known individual with an already booming fan base or a worldwide
brand which people automatically recognise, there has to be another connection.
Unless
people are looking for the information the blog ceases to exist unless you
decided to write purely for enjoyment, but come on, be realistic, most people
want their blog to be seen and want people to interact with them.
“If
no one see’s my blog does that mean they don’t see me?”
David Horsey- Blogging Cartoon
Since
the boom of the internet, even people who you would never have guessed would are
embarking on what they see as an intimidating and scary conquest of venturing
out into the unknown. But now, people are finding that it is more impossible to
succeed in life without doing so. The technology boom seems to have been the
spark with there being so many different ways of accessing the internet; Netbooks,
Tablets, phones etc. You have to keep up to date and that isn't cheap...
How
far are you willing to go and pay?
Nate Beeler- Cost of technology
You
can download social media apps; For example bloglovin.com which has an
app so that people can follow popular blogs. Most blogs you come across are
linked to that person or brands social networking pages of which also have
downloadable apps. Unless your blog is linked to social media channels, it is
much harder to spread the word and get people interacting with you.
I
believe that blogs and social media channels hold their own purpose and both
reflect off each other, neither being more worthwhile than the other but for
now social media having that stronger hold over the world.
Ok so i have only just started to use bloglovin. I decided to sign up to bloglovin because people kept telling me to look for other blogs which are similar to mine or blogs which i may be interested in, however where could i find them??? I didn't have a clue as i am new to blogging!
So i read up about this site 'bloglovin' which nearly every blogger signs up to which means other bloggers are able to find you as well as you finding them. SCORE! It is so simple to use as you can type into the search what or who you want to look up. Not only that but for some reason i just love how people design their buttons so i decided to do what i do best and make a button myself rather than just use one of their simple buttons...i'm not simple and i always go that extra mile. So why don't you. You just have to upload it as a HTML/javascript- I have posted about how to do this through one of my previous posts which is about creating/designing social media icons for your blog...The link is below: http://rebeccaemmaprice.blogspot.co.uk/2014/02/social-media-iconseasy-peasy-lemon.html
And finally...not only did i sign up to the bloglovin site, but i downloaded the FREE downloadable app to my iPhone and my iPad, so now i can have access to it where ever i go and whenever i want....DOUBLE SCORE!!!
So go ahead, try it for yourself and let me know how you get on by posting in the comments or your past experiences, i would love to know. People who sign up to bloglovin increase their followers as other people know you exist!!! Don't forget to follow me if you like this post by clicking on my bloglovin button. Or share me using the links at the end of this post.
This post has specifically been created due to the difficulty i had when trying to add social media icons to my blog site. It really is easy and it is unbelievable how SO!! many people really do make a mountain out of a molehill rather than just explain it simply!
So here is the easy, UNCOMPLICATED way to add icons which is hassle and headache free...i promise! Even the copy task has been done for you if you use photobucket as the host.
Step 1:
Find free social media icons... The site i used is called 'Mysitemyway Icon ETC'. There you can pick colours, shapes and download them into a ZIP folder ready to upload.
Or i personally recommend google or pinterest. Type into google whatever you want..colours, styles etc. Or you talented gifted people can create/ edit your own. I am a big fan of Adobe Photoshop!
Step 2:
Create a Photobucket account to host your icons...All you need is an email address and the images..simple!
Step 3:
Upload your images
Step 4:
Once your images are uploaded, click on the desired thumbnail image.
On the right hand side, click on the HTML embed code, it should automatically copy, do it twice to make sure if you like.
Step 5:
On your blog, go to Layout. Select 'Add gadget' and select 'Add HTML/JavaScript'
Step 6:
No need to add a title unless you want one.
Select the option 'Edit HTML'
Copy and paste the code from photobucket into the empty content box
You can select the 'Rich text' option to see the image
Step 7:
Repeat steps 4 and 6 for each Icon you want to use.
Make sure the code is pasted right next to the final part of the last code
Step 8:
To link the icons to your social networking page...
Copy and paste your social network sites URL address
Step 9
Highlight the icon you want to link to this page
Step 10
Swap to 'Edit Html' by clicking on 'Edit Html'
Paste in the copied Html code you just copied into the empty box
Each code you paste in paste directly next to the previous code----NO SPACES!
And make sure you past the right code to the right icon else you will have your twitter icon going to your Facebook account for example.
In order to make sure your social media icons open in a new window, rather than in the same window which i find is really annoying as it pushes people away from my blog then follow these steps:
Step 1
Click on 'Template' and then click on 'Edit Html'
Step 2
Click your mouse directly after <head> on row 4
Step 3
Copy this code:
Paste this code directly after <head>
It should start on line 5 and finish on line 17, if it doesn't make sure it does
Today i decided that i was going to try out a new bath bomb i bought from LUSH. I know it is a little bit late, but it is a limited edition bomb which they were getting rid of ready for Valentines day.... I made a video to show you what happened and i swear this has to be one of my favourite so far. This video was edited using Windows movie maker and it is actually my first video and first attempt at editing.
It is called the Halloween Limited Edition bath bomb 'Lord of Misrule':
When i moved back home after being away for 4 years at University, my parents finally let me redesign my room. Finally!!!
<-- This is the only picture i could find of my old room ---my best friend is going to kill me haha.
Look how immature and cluttered it is eeeek!
My mum agreed as she has always wanted me to be in a room which i am comfortable in and not embarrassed to bring friends home to see it (which it has always been!) which resulted in me sticking artwork and posters on my wall to hide the hideous wallpaper. It was a guest bedroom ended up looking like some run down old creepy mess! I just couldn't stand it but i have always made it my own. It took some hard convincing from my mum and me to make my dad finally agree. He did but at the same time he was a nervous wreck! I do love my dad to bits, he has faith in my ability to do a good job but he is a perfectionist/ hoarder so it meant him coming out of his comfort zone and letting me loose on his house...that was the hard part! And if it was left to him it would NEVER! get done!
Ideas time...
I have always had ideas about what i would love to do with my room. Because of the shape of my room and the amount of furniture i had, this meant it would be a lot harder.
I de cluttered my room literally dumping anything that i didn't want, being harsh as hell as a lot of the things i had in my room i had from a very young age and grew quite attached to.
Bin bags everywhere, wardrobe in tatters...looked good.
Colours...
I originally thought i was going to go with purple as that was my favourite colour growing up...then as i grew up it changed to a duck egg blue and the final spur of the moment choice...a dark lime green colour!
Well try explaining that to my dad, think he nearly had a panic attack saying we will never sell the house, it was funny but at the same time it made me want it even more...so i did.
I purchased all of the materials, paints etc from B&Q which in my estimation has gone up in regards to quality and service. I purchased a Dulux lime green (Can't remember the exact tone) in a matte with slight sheen finish. It was the paint which you pick the colour and get in mixed in store. So easy and because of the machinery used, it was guaranteed if you keep the code that you get the same tone each time which was my worry as i just about got away with having enough paint... I bought the largest tub costing around £40 with a medium size costing about £25-£30...there was a buy one get one half price deal on at the time thank god, so that helped keep the price down quite a lot. I thought the colour Lime green went with so many other colours and was so different...like how i am, don't they say a room is meant to depict the persons character and personality, well mine definitely does.
The room...
I started by removing all the wallpaper!! Took for ever but it felt so good to see the back of that ugly, fugly paper! I didn't use anything except lots of water, sponge and my poor, poor hands which were so sore at the end. Took me a whole day...i work fast!
Painting...
So big.....so hard but so worth it in the end!! Rather than explain how i painted.....BORING!!! why not just show you instead:
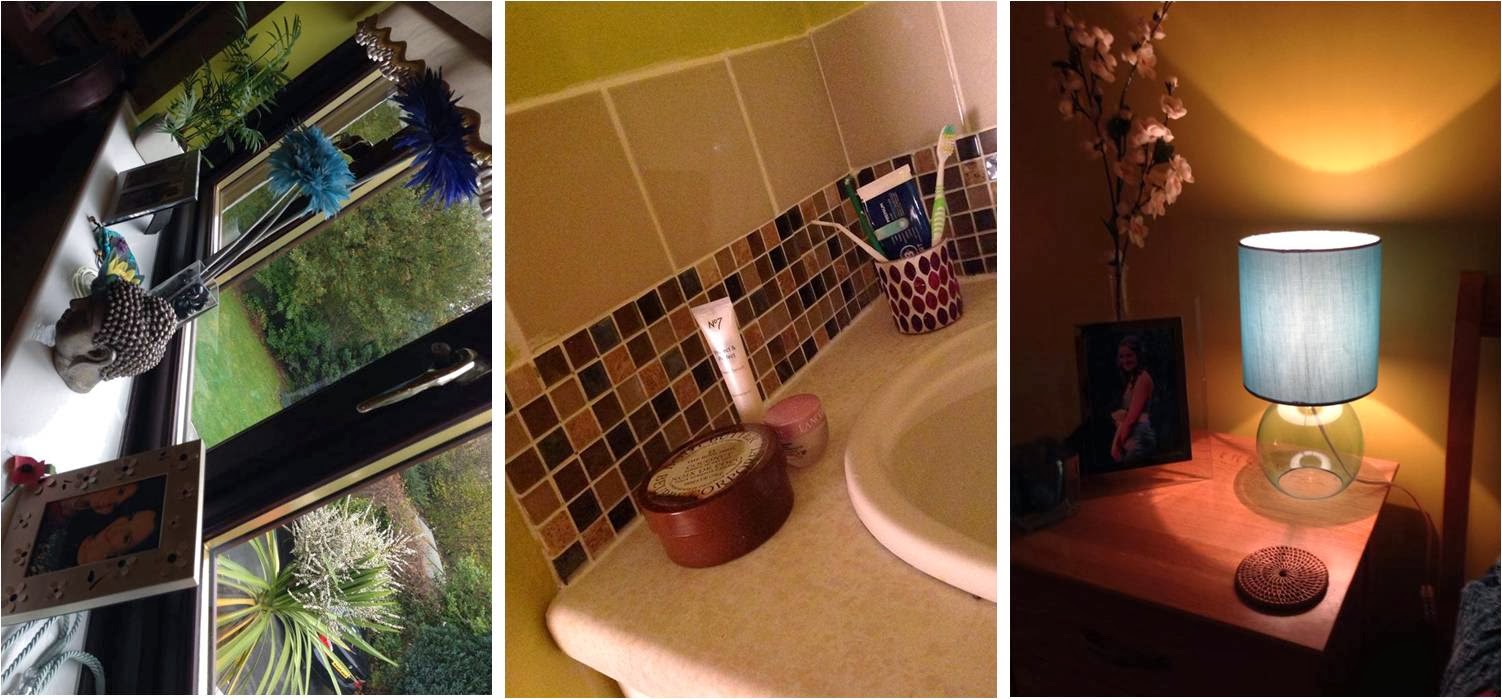
Re-Tiling...
As well as painting my room, i decided to do everything and redesigned the sink area by adding in my own colour scheme and tiles. Some of them had fallen down so it looked awful anyways.
I used a tool to help force the tiles off, i didn't really do that part professionally but it worked....
I then filled in all of the gaps with poly filler to make sure the wall was even. When it was dry i sanded it down so that there were no bumps, so it was smooth.
I then used an owned brand Diall all in one grout and tile adhesive from B&Q to use as the adhesive and the grout. I used mosaic tiles along the bottom of the wall and square tiles to go above. I used a brown and beige theme that would go with the colour scheme of the room. After i had secured my tiles, i then used a clean sponge and wiped away any white smears and excess grout.
The video i used to help me learn how to tile the wall is by a man called Paul Roberts. The video is extremely simple and easy to follow:
My photos:
Furnishings...
In my room i already had a single bed but since i moved back home i decided to invest in a double bed which i can use in my own place when i move out again.
However, i have only just ordered the bed frame and mattress from a company in Plymouth called Big SleepThe bed i ordered is a light to medium brown colour, think its called an Aztec theme. *I will put a photo up when it gets delivered.
However next door to Big Sleep is Big Pine and Oak Furniture store where i managed to get a chest of drawers and a bedside table in the clearance both costing me around £140!!! BARGAIN!
As well as my chest of drawers, i also have a tall drawer made out of wicker which really compliments the room. Available from Homebase. There is also a set of drawers which i bought from Ebay made out of sea grass which i am using until my new chest arrives.
As for the lights i have a duck egg blue lamp shade which i bought from Next home last year. I also purchased a Lantern from Homebase (which they still sell) for £10! On the ceiling i replaced my old lampshade with a dark chocolate brown twine ball for around £10 from B&Q. It looks beautiful with the wall colour etc.
Around my mirror, i used some white frangipani flower fairy lights which i bought when i visited Camden Market, London back in 2008. They sell them still on their website as well as a whole range of other fairy lights, lanterns.....too much to chose from really but they are all so beautiful! They cost me around £30-£40, and are pretty expensive but i love them, they are definitely worth it. Mine have lasted me about 6 years and still going strong.
I have a duck egg blue shaggy rug which i purchased from Argos for around £20.
My curtains are a patterned duck egg blue romolo, lime green and white flower curtains from Dunelm Mill from £20 with a wooden curtain pole which i already had.
Finally, other furnishings include my wall stickers purchased on Ebay. One of birds on a tree And one with writing to help motivate me, which i put above the door "Don't dream your life, live your dreams". Really does make me happy and motivates me. Both stickers are black as black on green looks gorgeous. I also purchased wooden black photo frames from Ebay...£20 for two.
I think my parents were pretty happy....so was i!!!!!